Sloppy's Rice Rocket *Build Thread*

Hello everyone, my name is Steven, I’m 25 years old and I live in Manitoba Canada. Here’s my build thread of my CR-X up to date, most of it is copied over from another from when I got it back in 2018 onwards.

For some back story I originally bought this CR-X SiR in the summer of 2013 right before I graduated high school and owned it for about twoish years before I crashed it in summer 2015. Sold it off to a friend of mine and recently bought it back in fall of 2018 and that’s where the build starts off.

Here’s a couple of pics of when I had it from 2013 - 2015


After that I parted the car out and sold the car to my buddy where it sat outside at my other friend’s body shop for awhile untouched.

About a year or so later I ended up buying a JZX100 Chaser


[

Then about a year after owning that car I sold it for a Midori EK20 hatch


I owned that for about a year as well before getting T boned in it last summer at like 5km/h, took the insurance money and got the car back from them and parted it out.


At that time I didn’t really know what i wanted to get next to mess around with but I’ve always wanted to get my old crx back, so I decided to hit up my buddy who I sold it to and asked him if he wanted to sell it. At this point the car just got the front end fixed maybe a few months before, I always kept up with my buddy to see what kind of progress he did to it and always hounded him to sell it back to me. Luckily for me, he agreed!

This is the first time I saw the car again in person in about 3ish years since I sold it


Before I even got the car back to my house I began buying parts for the car. I got another chassis harness off yahoo auction because I thought a part of the headlight harness got melted from the crash. Turns out the melted part of the harness was on the ac harness, so I just unplugged it and removed it from the vehicle. Luckily it wasn’t the chassis harness because the one I got was cut in a few spots and I think had an alarm or something attached to it at one point. I also started to stock pile whatever bnib moldings and misc items I could find and also managed to find some repro door seals as well.


Around September last year was when I got the car back to my house and started to dig into it since I knew that the car needed a refresh, even when I had it the first time around I knew it needed some maintenance but didn’t really do anything about it. This time around I wanted to do it all and do it right.


When I was going thru the car I noticed a crack along the passenger side door and decided to investigate, what I found wasn’t to good… I guess back in Japan the car had been hit along the side and instead of properly fixing it they just slapped on a bunch of bondo and painted over it, which is pretty common from imported cars from what I heard over the years. So be aware folks if you’re looking into a jdm vehicle.


At this point I started stripping the car down to the shell so I could freshen up the bushings and paint the interior and what not


Towards the end of the year I ended up living by myself at one of our house’s that we were trying to sell at the time so that meant a full garage all to myself


A few weeks later I prepped my engine bay for paint, I decided to do primer with clear over top or
“battleship grey” as some people call it, mostly due to the fact that cans of primer are cheap and I got 2k clear in a can at cost from work. I kinda jumped the gun on this one since I didn’t realize that my trans mount was bent and the bolt wouldn’t thread in properly and I missed a few spots so you could still see the black. I ended up sanding it back down and will respray it after mock up is all done.


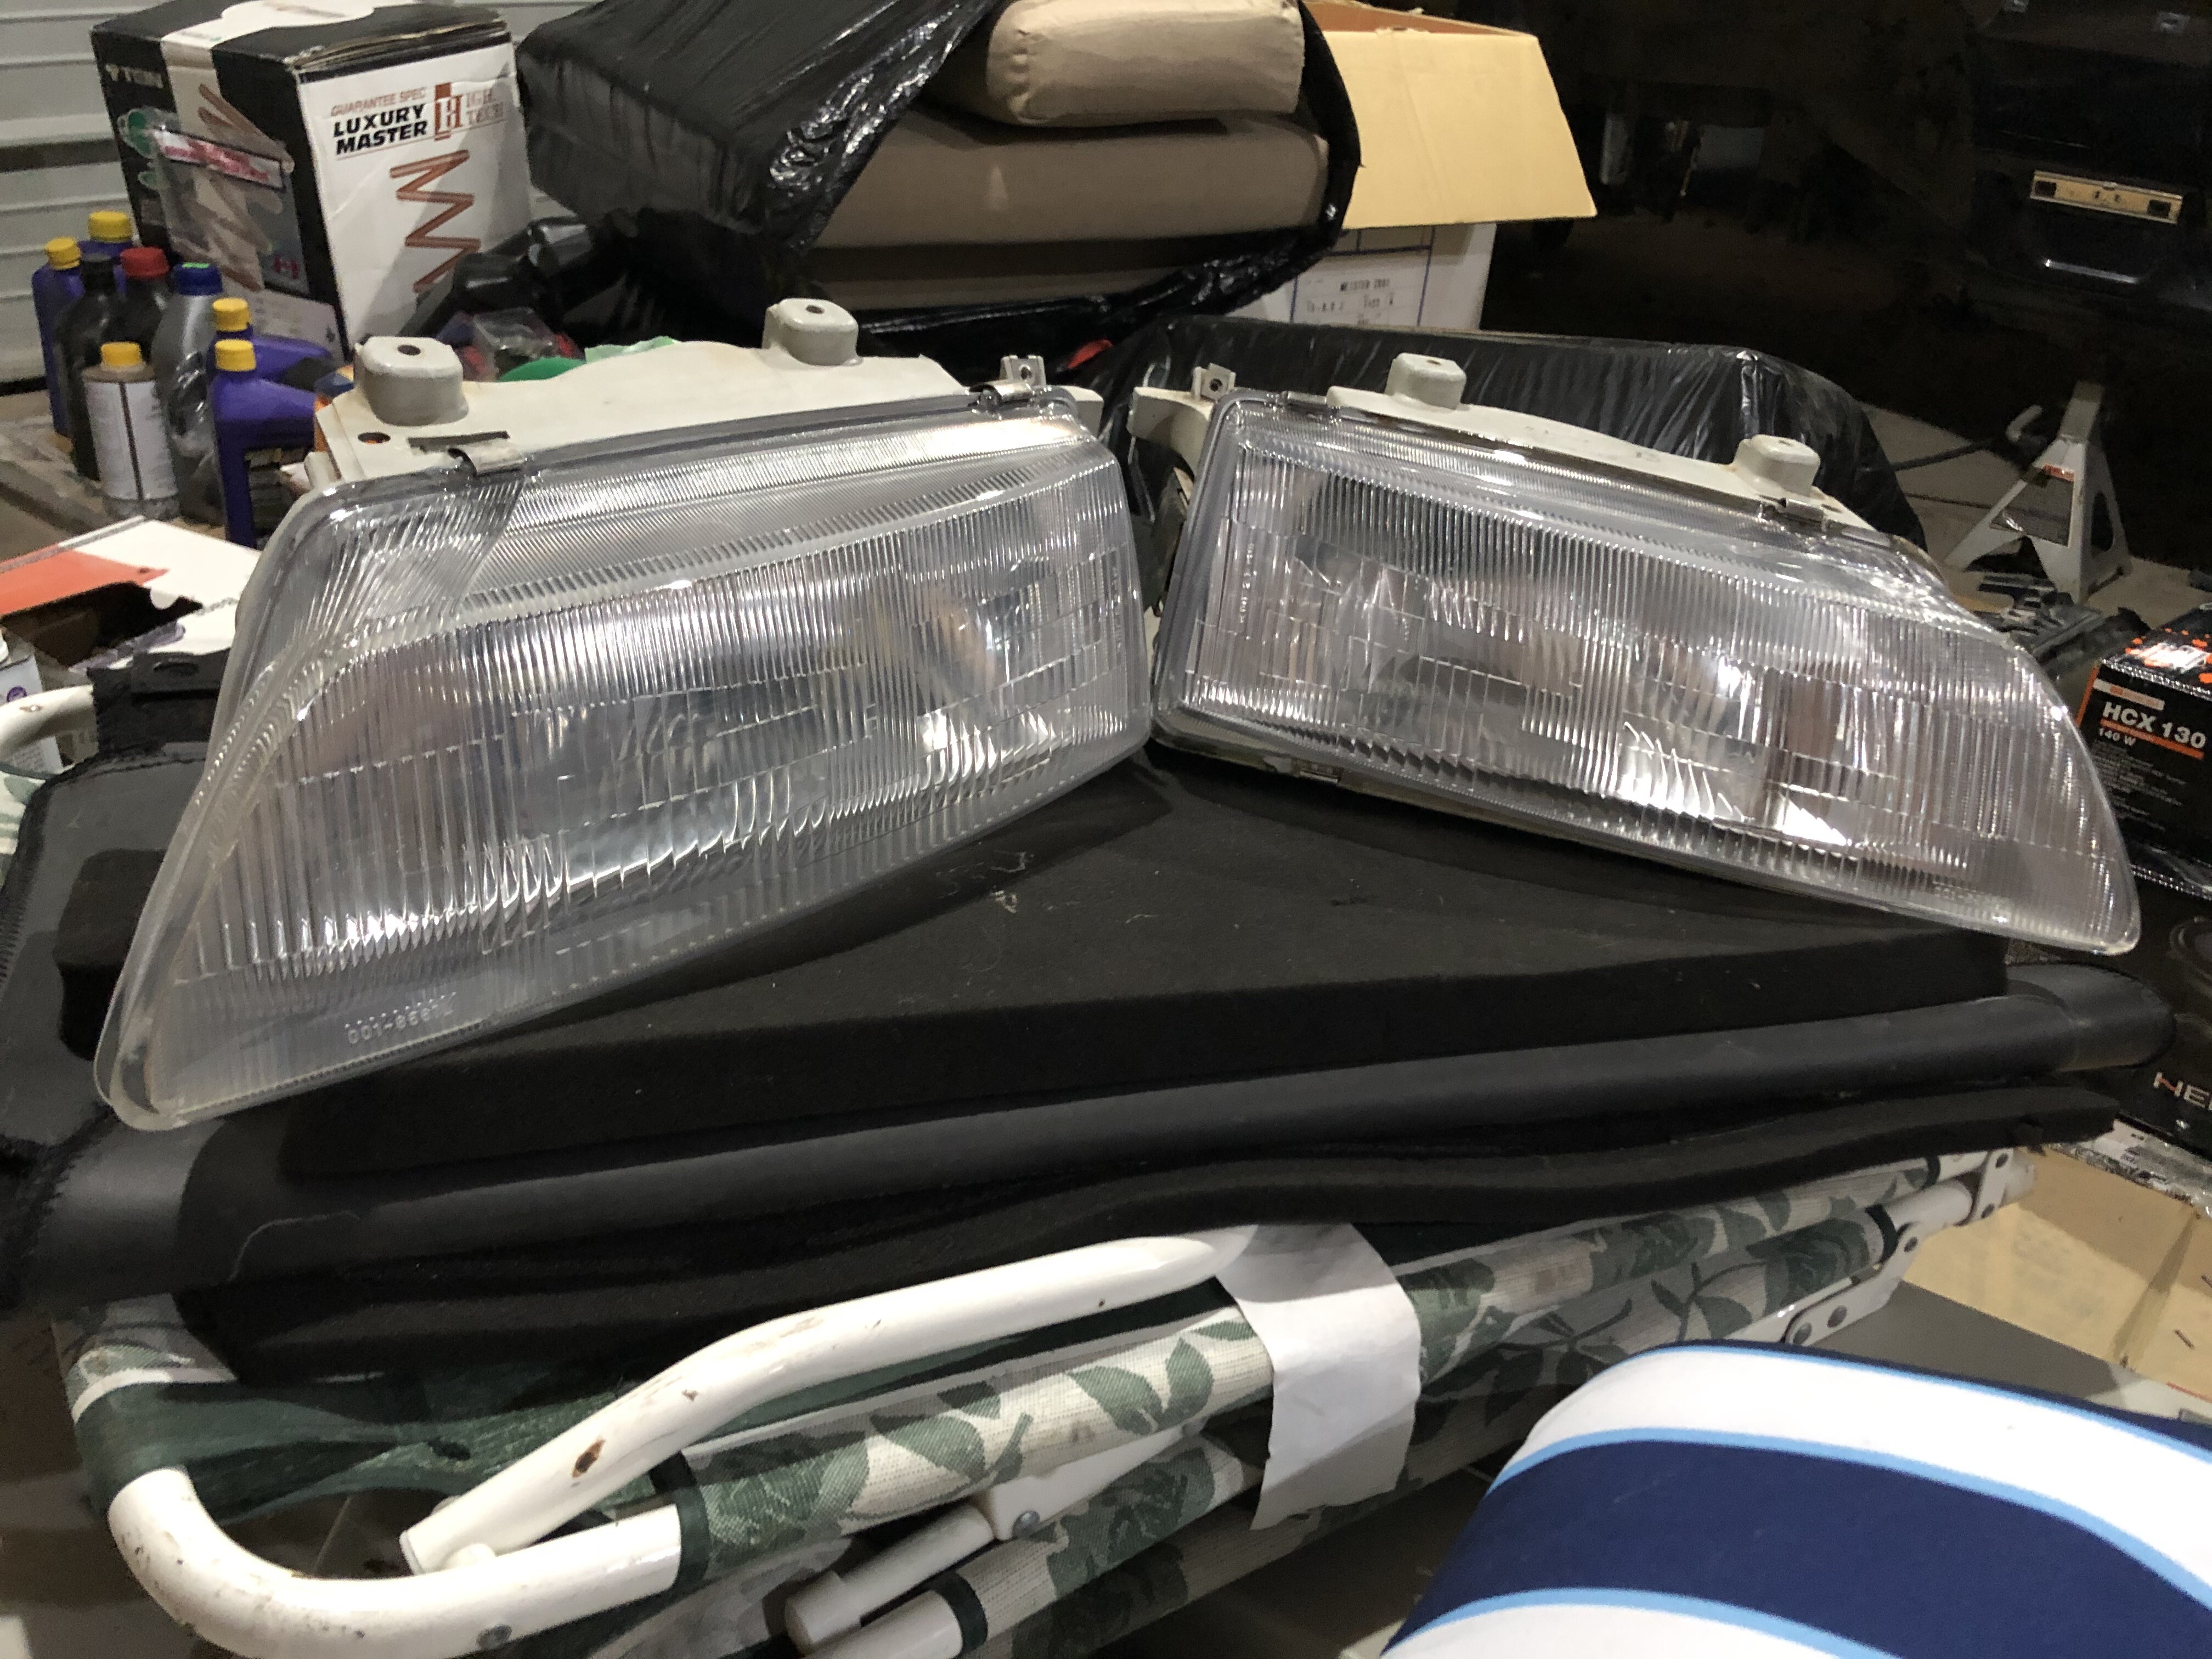
When I got the car back the SiR front wasn’t in the best shape as you could tell by the photos, the front hood came from another car that flew up on the highway, the headlights were another pair I had on hand when I sold the car since the tabs were destroyed when I crashed on the good set I was running at the time. Same thing with the bumper lights, lenses were in good shape but the tabs were busted off and the bumper was hacked up by the fog light area.

I was looking on ebay when I first got the car back and saw that they started to reproduce the edm single bulb headlights for non face lift vehicles so I decided that I was going to run 88-89 front end since I always liked it.
I ended up trading the cut up sir bumper that was on my car and the hood to someone else I knew who had an 88-89 setup minus the lights so I did a trade with him, strange I know. I ended up getting the repro headlights off ebay and they fit OK but had some gaps that I wasn’t to happy with so I decided to go back to the face lift front.


Up until maybe early 2019 I was planning on doing a B20v into the crx, I took the head off the B16 that was originally with the car and sold the short block and trans for dirt cheap since no one really wants that stuff around here. I picked up a big spline YS1 cable trans because I was planning on putting a 96’ itr gear set in it and had a 3 puck clutch that was practically brand new, all I needed was a lsd and the trans was pretty taken care of. The B20 block I had was a very low km motor which had about 30-40k on it only, I had a block guard, YCP pistons, aebs intake manifold and a few other things for the motor but had to part out that setup when I thought I had to get rid of the car. Long story short I didn’t have to sell the car but I sold a lot of my B series stuff in the process, so I said screw it and decided to go K series again.


I acquired a K20 long block that was disassembled from my friend and traded him the B20 block plus cash for it and started to collect parts over the next few months. I ended up getting a trans, mount kit, traction bar and shifter setup before summer and finally started working on the car again after a few months of not touching it.


While I was waiting for parts/saving up I painted the interior the same grey primer with clear over top and I thought it turned out pretty decent.


After that I started tossing the chassis harness back in and began to route the headlight harness for a tuck


Also bought an AEM fuel pump to replace the original one that was in the car, I was pretty worried that the inside of the tank would be all rusty but it was spotless inside!


I was originally planning to fix the damage on the passenger side door but I decided to just swap out another door since it was easier and the power window regulator was dead on that side. To replace that regulator was gonna be over $200 shipped for a used one… Instead me and my buddy went halfers on a parts car so I just replaced the door and left the manual window setup in it, the drivers side will be converted to manual windows as well.


Quickly tossed in the carpet, dash and centre console in, just to look at for a bit

Bought a uncut rbc intake manifold from another one of my buddy’s but ended up traded it for a cut one for my k20a2 head from a buddy who needed an uncut one. As you can tell a lot of my parts came from my friends lol

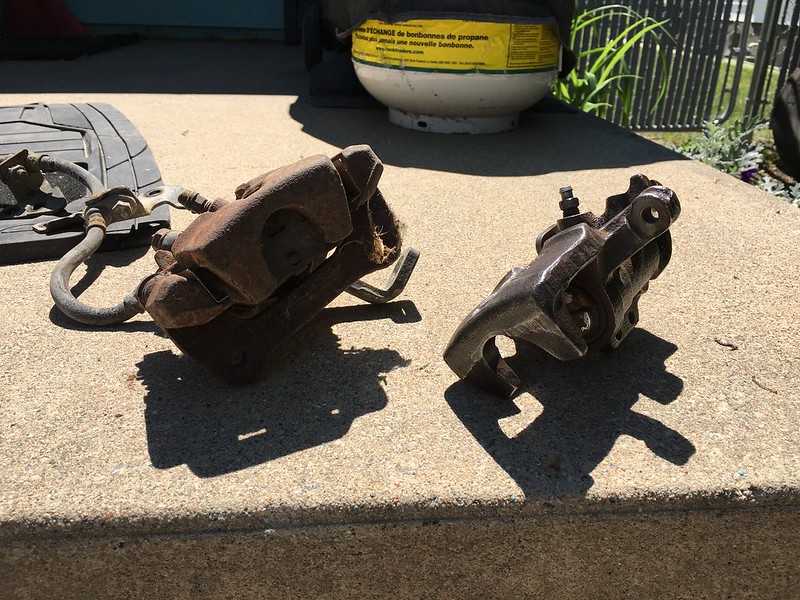
My rear calipers were all rusty and gross so I took a wire wheel and drill to them then hit them with some high temp paint. I got some CRV/ITR/CTR calipers from my buddy and did the same to those as well. Those will need new seals and pistons before they go on the car.


I ended up getting a shifter box and oem cables off my buddy who also supplied a lot of the parts for my K swap and quickly cut my centre console to fit the shifter. Im using a “ktuned” base plate that I bought for $20 from China. I plan on using the stock box with hybrid racing bushings in each end of the shifter cables and some upgraded shifter springs from mtec. I had those springs in my ek20 hatch and it was a night and day difference with them in. No need for fancy shiny shifter box here.


So between me getting the K20 long block I also picked up a K24 block which I was gonna use to run K24/20 on, so this first mock up is with the K24 block and K20 head but I just recently decided to run the K20 long block instead since It was more complete. First mock up went well, had to trim a little bit of the subframe for trans clearance but it was pretty good. Its a tight fit in there but it fits. I’ll make another post about doing a K swap in factory B series EF’s since there’s a little bit more work involved with it.


Since I was planning on running K24/20 at the time of mock up I had to trim a little bit of the skeleton of my Js hood that I kept from the crash. It’s going to get fixed and painted so no need to get another one, plus they don’t even make them anymore so I have to fix it at this point.


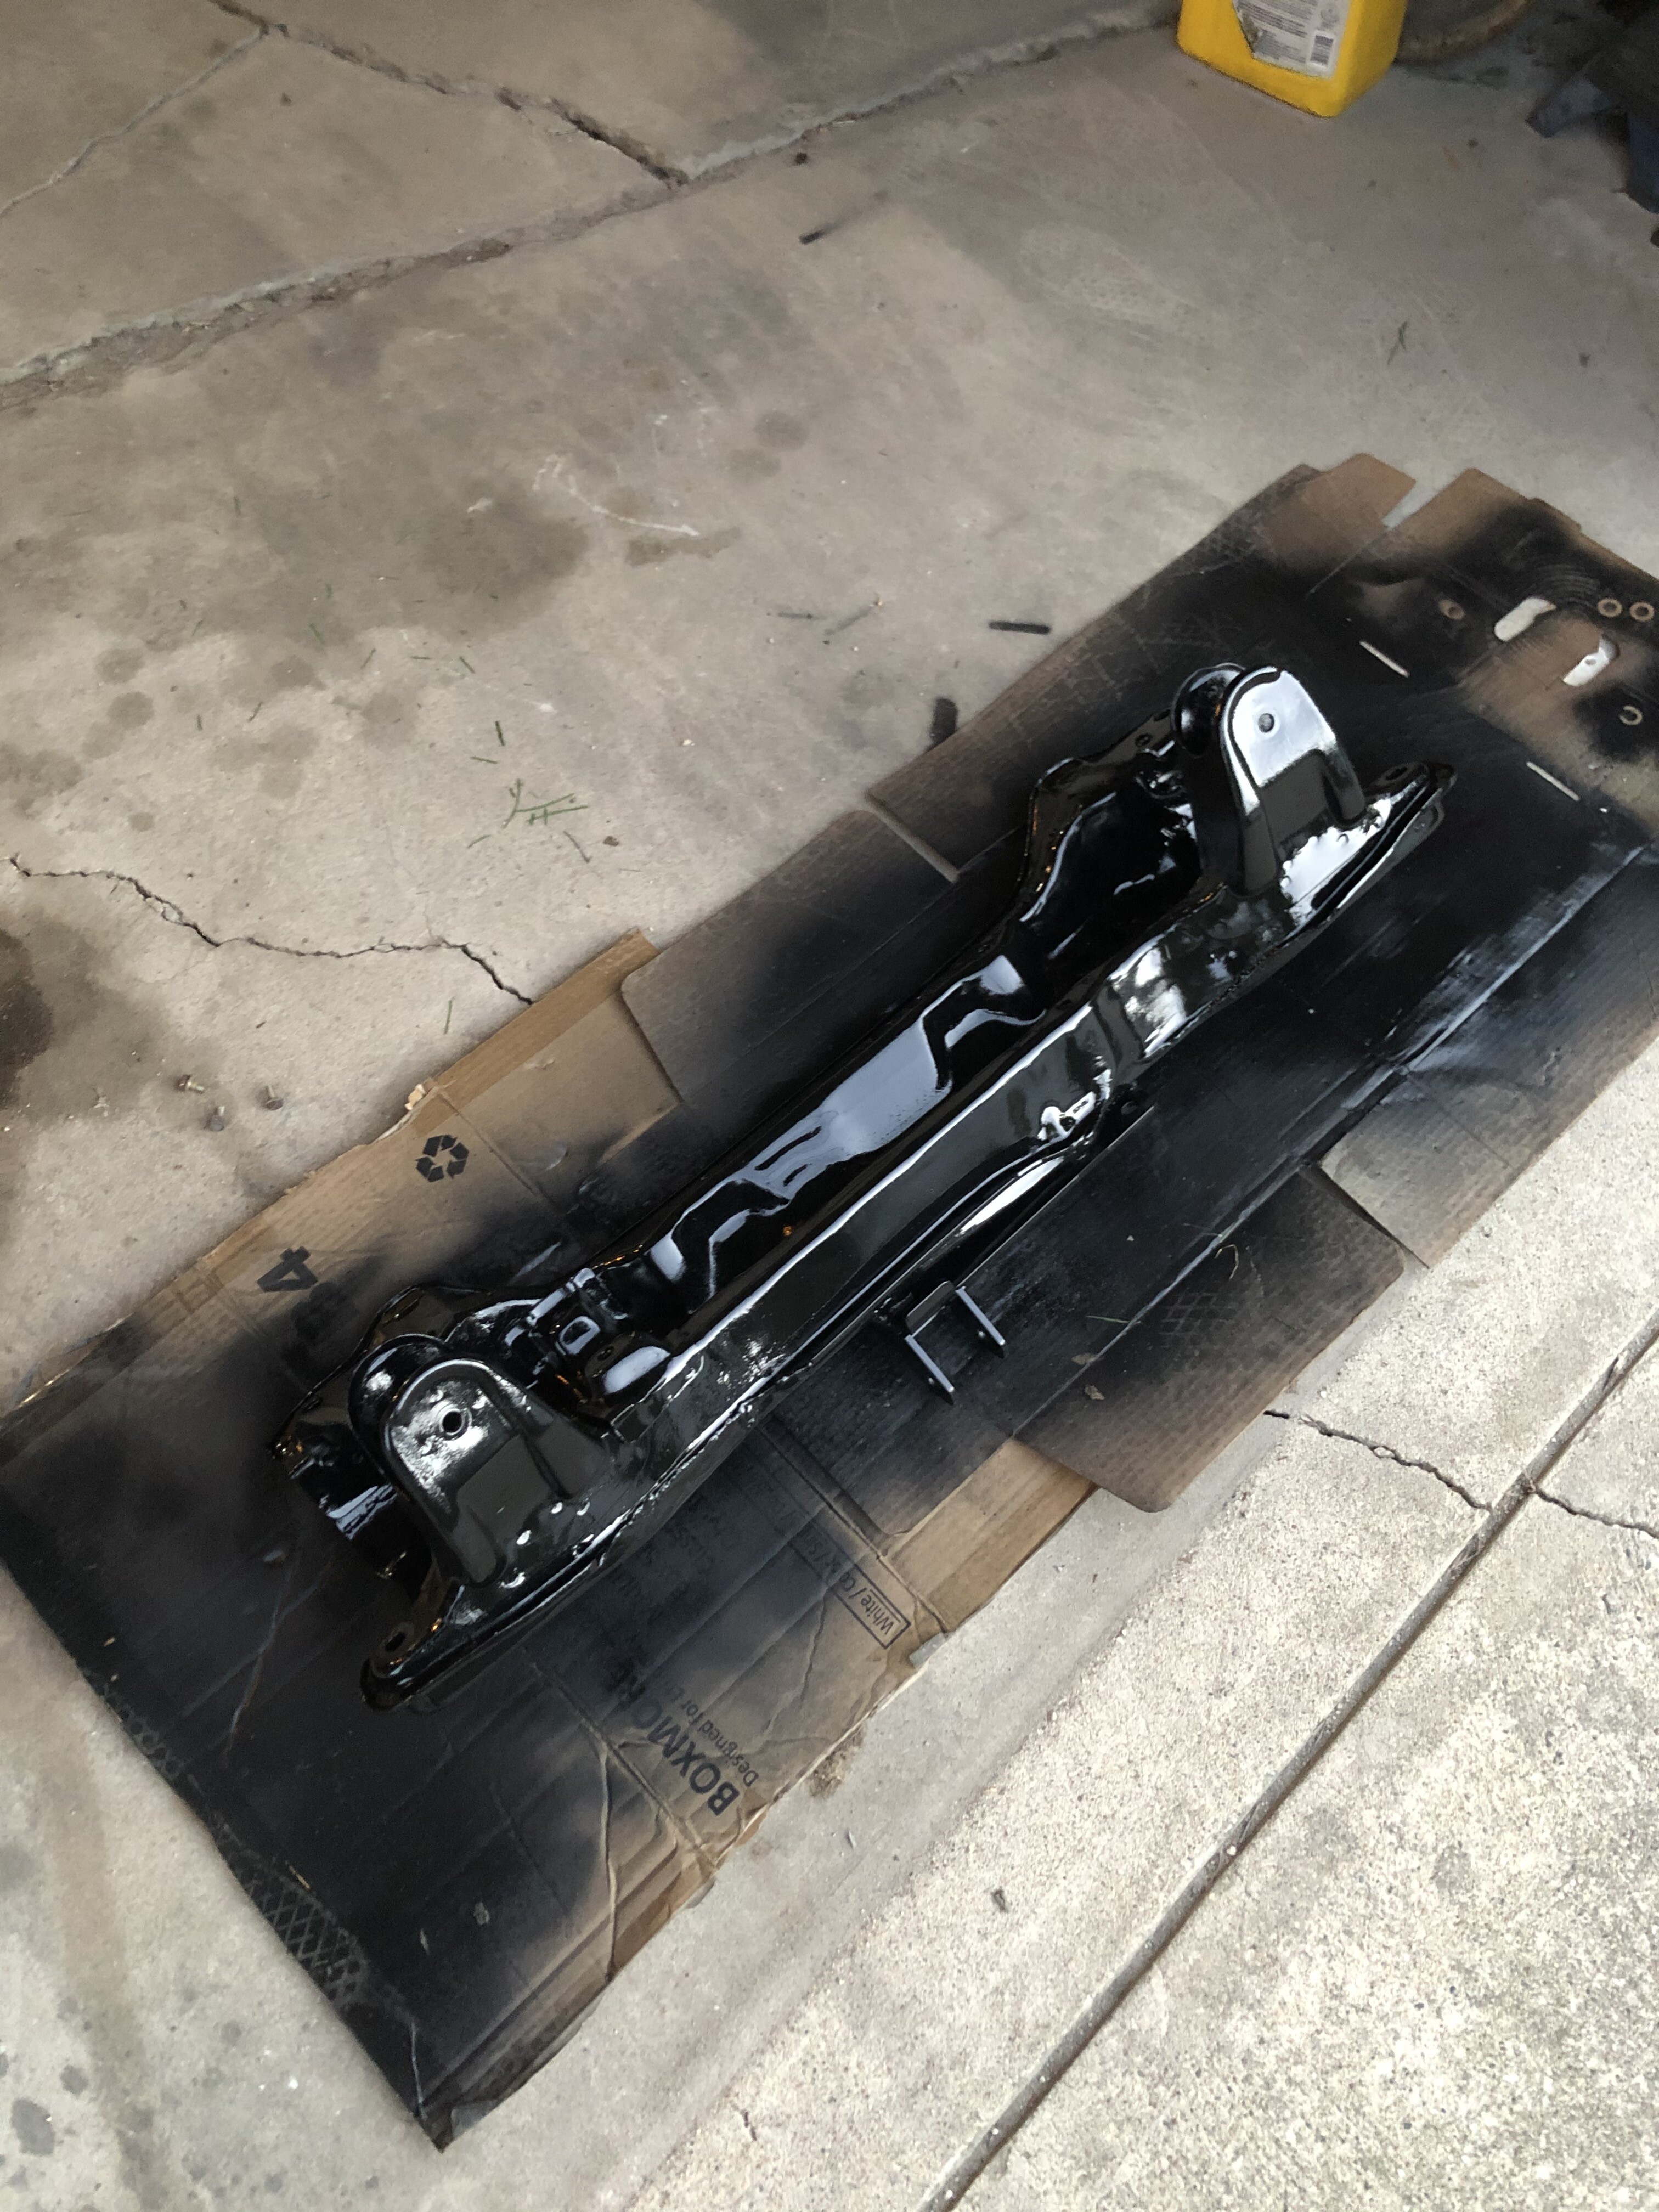
I did another mock up a few weeks later after I got my rear mount tack welded on the subframe since I can’t just bolt it up to the subframe (different on SiR). I also tossed quickly tossed on my Innovative traction bar, the SiR chassis uses the DA integra front cross member. When the car got put on the frame machine and fixed they didn’t have a cross member on hand so my holes were slightly off by .5" or so, so I reamed them out a little bit and it fits fine. I originally had an issue with one of the front forks hitting against the radius rod but that was due to a sagged bushing. The front control arm bushings ended up getting replaced with Hard Race hardened rubber ones. Most of the bushings on this car will be from them.


A buddy of mine who is also an ef guru painted my fuel pump cover, filler neck cover and a plug that popped out of my floor at work. I was just gonna spray them primer with clear but he insisted to paint them so I gave them to him and got them painted black

Since I was going K series that meant that I had to either convert to hydro or run the hasport cable to hydro adapter and that was something I didn’t want to do. For LHD cars this is easy since you would just get the Hush Performance kit and convert it but with RHD it was a bit harder. Up until a few years ago no one made a kit for RHD cars so you had to make your own. When I got the car back I did some researching and found a company called EFED Conversions out of New Zealand who makes a very trick conversion kit. Check out his page on facebook or Instagram under the same name, if you have a RHD car this is the kit to use hands down. He has a detailed thread on OZHonda about the R&D on this kit he makes.


Just last weekend I crossed the border into the States for about 30 mins and picked up my Js bumper that I order during the summer to replace the one that I blew up when I crashed. Pretty damn expensive but worth every penny imo, there isn’t any other bumper that I would run on the crx, for me it has to be the Js one. I also grabbed a VW Scirocco radiator that I ordered off ebay that will be used as my budget tucked radiator. After watching the Vtec Academy budget K24 CRX series using his radiator I decided it was the one to go with, I ended up getting the smaller version which is 100mm shorter but leaves me room for oil cooler hoses if I decide to run one.


Earlier this week I received some parts from Rob over at TracTuff, ended up getting a swirl pot, rear coolant outlet pipe with -10 fitting and this fitting that going into the thermostat housing that has a -10 end on it.

Originally there would be a metal hard pipe attached to the plastic thermostat housing and will route around the side of the cylinder head and end at the back of it where a heater hose would attach to. Since I wasn’t planning on running a heater I didn’t get one with my plastic housing and was going to be capped. This fitting allows you to run a -10 for your heater, there’s also a -6 version as well. I also wasn’t sure if the metal pipe would even fit with the swirl pot in the way so I decided to get this and run braided hose for my heater lines.The two fittings will have -8 reducers and the hoses will run to an aftermarket heater in the car.

This swirl pot was a piece that I always wanted to get since I had my EK20 hatch but never had the money for it, luckily for me he was running an offer on his parts that I couldn’t ignore and I scooped one up. I ended up getting the options for the 5/8 barbed fitting for the recirculation line and for a coolant temp sensor up top on the neck. I also got it to use domestic style radiator caps since I can get Stant ones locally for very cheap.


]

Just another quick update, I bought some universal Js Racing flares on black friday and they showed up earlier this week. Apparently these were the last set that Js Racing had in stock and have been discontinued.


I quickly put the drivers side lights on and toss the hood on so I could take a few pictures. Don’t mind the gaps, nothing is bolted on except for the fenders and the bumper is just on the 2 plastic guides on the fender.


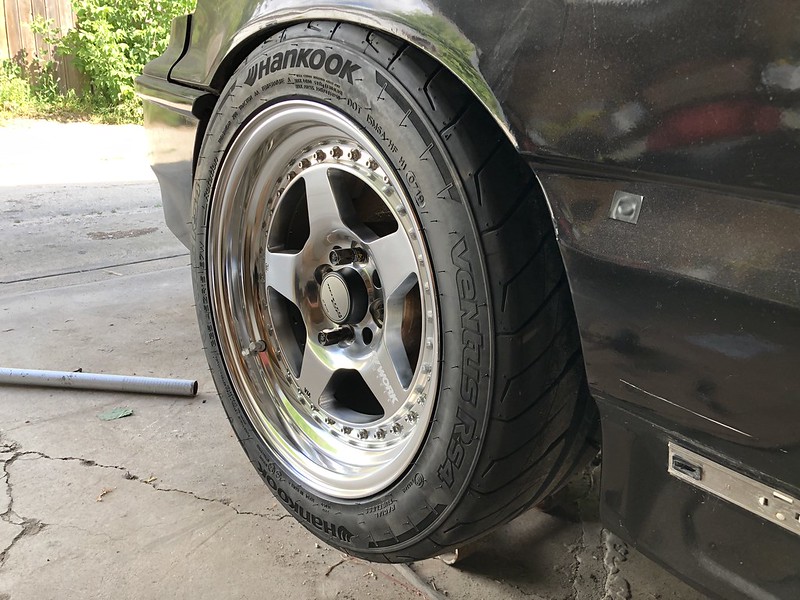
Earlier today my buddy lent me 3 15x8 Work CR01 wheels with offsets ranging from +22 to +48 so I could see how much room I have under these flares. Pictured is 15x8 +35 with a 225/50 A048 tire and a 15x8 +22 with no tire. There’s about 15mm to the inner lip of the flare and roughly 20mm to the outer edge of the flare with the +35 wheel and tire. Couldn’t really gauge the +22 that well but I think with the same tire on it would be almost flush with the flare.


]

Hey folks long time no see, been busy in the last few months so I haven’t really gotten anything done plus it’s been cold in the garage so I have no motivation to do anything whatsoever. But as usual in those few months I’ve been acquiring some parts whenever I see some deals.

Picked up some Spoon rep mirrors for about $20CAD from the local speed shop that did a huge garage sale of a bunch stuff they had laying around. I’m curious to see what the view is going to be like but I do know someone who makes rhd lenses so may have to get those if needed.

One day at work one of my co workers was talking to me and mentioned swapped his motor out of his Element for a lower km one and asked me if I wanted it for $250. So as usual I impulse bought it and now was planning on doing a K24/20 again.

Now that I had acquired that motor I wouldn’t need to get new bolts and sensors for my swap since I was trying to keep it pretty budget still. The K24 block and K20 block I had were disassembled and were missing almost all the bolts and sensors so this would cut down the cost quite a bit. I started to look for a set of used tsx piston and rod combo for the K24 block to replace the Element ones and so began my nightmare for the next month or two.

The first set I bought I got off the k20a Facebook page I bought towards mid Jan were supposed to be shipped within a few days but didn’t get a tracking number after a week. Messaged the seller and said he had some personal things come up which is fine, things happen so I kept on waiting. Another week went by and still nothing, so I messaged him again and he said he got into an accident with his truck and it’s in the tow yard and the receipt with the tracking number is inside. He was supposed to send it after he went to the yard to grab it and yet again no tracking number. So at this point its been around 3 weeks at this point and I knew that I wasn’t going to be getting this parts so I filed a claim and ended up getting my money back. The was the first time in all my years of buying stuff off the internet where someone tried to scam me.

The second set of pistons and rods I got was from the same Facebook page but different member, great to deal with, sent me photos and videos of the pistons and rods and told me he would get them out same day. Sent the money and got a tracking number next day as promised. About 2 weeks go by before they show up and once I opened the package all hell broke loose. The guy took all the end caps off the rods and just tossed them in the box along with the bolts and put the pistons and rods in with no padding or anything. So the whole time the bolts and caps were flying around damaging the pistons and caps during shipment. Not to mention the caps were all mixed up now and can’t correctly match up which cap is for which rod :yell: :yell: :yell:

So now at this time I was just fed up with everything and decided to just scrap the idea of going K24/20. Now I was planning on using the K20 block since It had pistons and rods already in it and just needed an oil pump and pan then the bottom end would be complete.

During the whole piston and rod ordeal I did find a good deal on an K20 aluminum pan and Type S oil pump kit from another member on the k20a fb page. I know using an used oil pump isn’t the greatest idea but the listed said the pump was brand new when put on the engine and only had a few thousand miles on it before he parted out his car. It also was a complete Type S kit so it had the chain tensioner, guide, chain, windage tray and bolts for everything plus it was already notched for a K24 block. I stuck up a deal with him since he also had the aluminium pan for sale. I was worried that the pan and pump kit would show up damaged like the the pistons but to my relieve they came in fine. I brought the pump and chain to work to clean them in the parts cleaner before they were to get installed


Yet again one day while I was scrolling on the k20a fb page I noticed someone selling a TracTuff billet thermostat cover which was something I was looking to get down the line. But yet again the price was too good to resist and impulse bought it.


Around this time it was starting to warm up so I took the time one day to clean up my side of the garage which was a complete mess. Didn’t take a before photo but I cleaned it up a lot and organized a few things to free up a lot of space.

After that I had some motivation so I pulled the motor out yet again and took the subframe off so I could get the rear mount welded up. I only got it tacked on last time to confirm placement so I took it back to my buddy where he adjusted the mount and welded it in place.

Since now the plan is to use the K20 again I went to look for a cylinder gasket kit for it since it had every gasket I need for the head and came with a head gasket. I was going to order the oem Honda one thru work but one day I found one from a Canadian parts retailer that had one for half the cost as oem and even listed the oem part number. I was curious to see if it actually was an oem gasket kit or not so I bought it along with a Hondata intake manifold gasket and Hybrid Racing RBC to PRB throttle body adapter.

When the packaged showed up I quickly opened to see if that gasket kit was in fact the oem Honda one but it turned out to be an aftermarket one. I wasn’t disappointed or anything I kinda figured it would be for that price but I had to take a chance. I did some Googling and from what I gathered the company who makes my gasket kit is called Ishino in Japan and sell parts under Stone. If what I read is correct Ishino is the manufacturer for a lot of Honda’s gaskets so the quality of them is very good if not the same as oem.

At this point it’s almost mid March then the whole covid-19 thing ramps up and things are changing fast. I just finished my aerospace course and had an interview with a company a week before which I had high hopes for, things were looking great and the motor didn’t need a lot of work so I was on track to getting the car running by the time I wanted it to but things started to fall apart, fast. Hours got cut at my part time job at first then ended up getting laid off all together, the company I interviewed for put the hiring process on hold and the Canadian dollar is dropping fast. This threw a wrench in my plans very quickly and now I’ve pretty much put the car on hold until next year. I was really pushing to get it out this year but with how things are looking it’s just not a smart choice and track dates are up in the air currently and may not run this year at all.

For about a week I was pretty bummed out and lost all motivation to do anything again but decided to get up off my ass and put some work into the crx since I had the time to do so. I put the subframe back on and dropped the motor back in for like the 5th or 6th time along with the rbc manifold and swirl pot. I didn’t put the throttle body adapter on yet but that would cause some new issues to be find only a few days later.


A few days later I tossed the front and rear suspension on minus the struts, borrowed a pair of 15x8 Work CR01 w/ 225/50/15 tires off my buddy and dropped the car on the ground. I wanted to gauge what the car would look like with that setup since I was planning on running that tire and wheel size anyways. Once I stood back after lowering the car on the ground I just looked and admired. The front height was near perfect of what I wanted it to be maybe slightly higher or lower but the back needed up come up a little bit to match but looked sick the way it was. I quickly put the headlights, corner lights, bumper and hood on and just admired it for awhile. Seeing it like this really motivated me to keep on going after seeing it on jack stands for so many months. (Sorry for the quality of photos at this point, my iPhone 6s isn’t holding up as well as it used to)


4 Likes

The next day I went back into the garage to toss on the adapter plate and the rsx throttle body that I had kicking around for a few months and came into this issue which I kinda thought I would run into. I didn’t have enough room for the throttle cable bracket that would bolt onto the throttle and for the cable itself, the swirl pot that I had bought is in the way and it looks like there would be an issue with having an intake installed too.


TracTuff offers two styles of swirl pots for the K20 and the one I got is V2. The V1 has the tank further back beside the valve cover so that would have cleared the cable and bracket. So normally you would just sell the swirl pot and get the V1 right? Well that’s kind of easier said then done since a lot of the TracTuff products are customized to order and people may want different options. Plus once again I got this piece for a hell of a deal and there was no way I would be getting that again so I did the crazy thing and sold the rbc manifold and adapter. Why? I figured it was easy to sell the manifold and to get something else vs selling the swirl pot and ordering a new one, mainly due to the fact I can save money on a used manifold whereas I would have to order the swirl pot new.

I started to look into other manifolds that would work and my only option would have to be a center feed manifold since it does not come close to the tank and the intake would not run by it either. Yeah I know, the rbc is better suited for a stock K20 with bolt ons and the center feed is crazy overkill but whatever. After some looking I set my eyes on the Xcessive Manufacturing intake manifold mainly due to the fact that it was the cheapest option out there. :rofl:

Once again while scrolling the k20a fb page I stumbled upon someone selling this manifold w/ the optional velocity stacks and Q45 throttle body. I didn’t really want the Q45 throttle body so I sent him an offer for it without it and to my surprise it took it! I got it sent to the border along with my Type S harness and Karcepts fuel rail that I also bought a few weeks before and will be picking them up after the border re-opens.

Now that I have this manifold I started thinking about doing the K24/20 build again and maybe saving up for an used cnc ported head and cams to really make use of this manifold since it turns out that it has the big boy 58mm intake runners vs the 50mm that is also offered. So this build may or may not snowball really fast lol. I’m hoping that the border opens up within the next month so I can bring some more updates but that’s all for now folks.

Hello everyone, thought I’d post an update of what I’ve been up to for the past few months since the last post.

First off, hope everyone has been well during these times. I ended up getting the job I was talking about and started at the end of April. Finally making good money now and I’ve been treating myself well as you’ll see further down this post. Acquiring parts as increased ten fold I’d say and I’ve decided to upgrade a lot of things where I originally tried to save a few bucks here and there.

Off the top of my head I’ve ordered (* parts received):

PCI front upper control arms
Radium direct mount fpr
Honed developments booster delete*, front and rear geometry kit, rear camber arm, solid rack bushings, trailing arm gusset kit
Hardrace inner and outer tie rods*
Karcepts 36mm hubs*
OEM tail light gasket kit*
TracTuff swirl pot*, overflow tank*, oil chain baffle*, main girdle plug*
Unit2 Fabrication baffled steel oil pan*
Rywire brake line tuck kit*, chassis harness adapter
Autopower roll bar
Osaka JDM V2 fenders
Hardrace rear lower control arms
Mfactory 1.0way plated lsd
Clear bumper light lenses
ASR rear subframe brace + 24mm sway bar kit
Custom indoor cover
Hybrid Racing v2 shifter*, shifter bushings*
Checkerd Sports hub*
Karcepts fuel rail + iacv block off plate*
Acuity shifter selector springs*
x2 15x8 +22 Work CR01*
x2 245/40R15 Hankook RS4*
x2 225/45R15 Hankook RS4*

As you can see, I’ve been knocking things off the list fairly quickly. On the flip side I haven’t had a lot of time to work on the car since I’m pretty tired after work these days. I’ve managed to do a few things here and there so lets get on to it.

In the last post I talked about how I had that issue with my swirl pot and my rbc manifold, so I went a bought a center feed manifold. That was stuck at the border along with a few other things for awhile but I did manage to get them after I got a courier company to go grab my packages for me. During that time I actually ended up trading it along with my swirl pot for another rbc manifold plus cash because the center feed manifold had 58mm runners. I was hoping they were the smaller 50mm but they were the bigger version which was way too big for a stock motor and I didn’t want to spend the money on a built motor. To go with the rbc manifold I ordered another swirl pot, but one that would work with the manifold and an overflow tank to go along with it.

After I got the center feed from the border I quickly tossed it on to see what it would look like and to see if I could even run it if I wanted to. Turns out it would’ve been a pretty tight fit, so I was better off with the rbc manifold in the end. The manifold had this really nice textured finish which Im pretty sure wasn’t factory but I did like it


For my shifter setup I was originally planning on using a stock shifter box with stock cables with upgraded shifter bushings to save a little bit of cash but after getting hired I decided to upgrade. A buddy of mine had a hybrid racing v2 rsx shifter box for sale so I asked how much he wanted shipped for it since I’m up in Canada. He gave me a great price and I had to have it. He even toss in a shift knob which I quite like, feels nice in the palm of my hand. Right away you could tell how much more solid this was over the worn out oem shifter box I had. Thinking about getting another center console trim piece to replace mine since I trimmed it for the bigger oem box.


To go with the hybrid racing shifter box I also ordered hybrid racing shifter bushings for stock cables. They’re a cheap upgrade for stock shifter cables and get rid of the old worn out ones. Unless you’re cables are stretched there isn’t a need to get the race spec cables in my books. Installation is super easy, only hard part was taking out one of the old rubber bushings. I even managed to save a few bucks by finding an open box set from an online retailer that I frequently use.


After getting the new shifter in I quickly cleaned out the interior of the car since it had been used as a storage unit for a few months. A quick vacuum and wipe down did the trick for the interior so I tossed on my Checkerd Sports hub that had been at the border with my manifold. I used to have one of these a few years ago with the horn function but they seemed to be discontinued for EF/DA up until a little while ago when Raul mentioned he was taking pre orders for a small batch of EF hubs again. I knew I had to get one even though I would have to figure out how to wire in my horn button. There’s also a slim version which I’m debating about getting if there’s any left by the time I want to get one.


After getting the interior back in again I noticed that my column is kinda pushed towards the right when I was looking closely at it. I can’t seem to get it to straighten out for the life of me. I thought I had the steering joint on backwards so I flipped it around. Apparently I had it right the first time and flipped it back to what it was before and make sure that the column sat as deep as possible into the joint. I managed to get it to straighten out a little bit but it’s still not the greatest.

One piece I planned on using from the get go was the Honed Development booster delete kit. I had one for my old ek civic but sadly never got the chance to install it before the car was written off. This booster delete isn’t like the other kits on the market which are a flat plate on the firewall. This one pushes the master upwards and outwards slightly to achieve proper pedal ratio for manual brakes and you drill a new pivot point in your brake pedal. To go with the booster delete I have that 7/8 ek master cylinder I got awhile back, which is what they recommend if you use 282mm rotors or aftermarket calipers.


Another thing I like to do is browse yahoo auctions late at night to see if there’s any cool stuff worth buying. One night I found a set of oem tail light gaskets for an ok price. They were cheap and I weren’t excepting them to be since the small gaskets were discontinued but no one was bidding so I scooped them up. As soon as I sent the money for those I found out that RestoTuner (https://www.restotuner.com/product-page/1988-1991-crx-taillight-gasket-set) has started to make reproduction tail light gaskets for the fraction of the price that I got mine for. Needless to say I’ll be ordering a set or two of those.

Awhile back I got my package containing my TracTuff order and couldn’t have been more excited. You definitely get your moneys worth with his products and they look amazing as well. The rbc manifold has to be shaved just a little bit more for the billet neck but it almost fits perfectly as is. I got the overflow with the option to mount in the factory location and its a tight fit with the headlight! Just barely clears it.


Another thing I got with my TracTuff order was this low profile XRP 90 degree -16 fitting. I was worried about space between the radiator I was planning on running and the 90 degree -16 fitting I would have to add onto the TracTuff billet thermostat housing I have. With this low profile fitting I can eliminate the need to have a big 90 degree fitting attached to the -16 male fitting that the housing comes with and save a inch or two of space between it and the radiator. The fitting was stupid expensive but I needed it so what can you do.


Another place where I did some changes was to my oil pan. Originally I was going to run the stock oem aluminum type s pan with some sort of baffle, most likely the clockwise motion one since I heard great reviews about it. That was the plan until I saw the steel baffled pans that Unit2 Fabrication offers. You get a brand new steel pan (no core needed) with his baffle that is actually bolted into the pan so you can remove it for whatever purpose and its reasonably priced. According to him it has 7 trap doors in it compared to Moroso’s 5 in their baffled pan.

One thing I had a hard time deciding on was what wheel and tire combo I was going to run. I kept on going back on forth on it up until a few weeks ago when a friend of mine told me he was selling his extra pair of Work CR01 in 15x8 +22. I wasn’t expecting them to be cheap but when he told me the price I had to scoop them up before anyone else did, they were too good to pass up. To match these I plan on ordering another pair of Work CR01 but in 15x9 +10 T Disk. T disk is what Work calls their big brake face option when custom ordering wheels. The 15x8 are an A disk which is the standard face and have a 57mm lip according to Work’s wheel chart. To match the 57mm lip in 15x9 T disk, +10 is needed according to the chart so that’s where the Osaka JDM fenders come into play. Those are 3cm wider than stock so I hope they fit under there. If not, I’m gonna have to get the Tracklife fender cut outs and space out the fender slightly.


For tires I decided to go with Hankook RS4. After talking to a few people and reading some posts online I decided to go with the RS4s since they were a pretty balance between grip and tire life. Won’t be the fastest guy out there on the track but I also won’t be spending a lot of money replacing them constantly. I went with 225/45R15 for the 15x8 and got a pair of 245/40R15 for the 15x9s that I plan on ordering. I got these tires for really cheap thru my friend who works at parts at the local Benz dealership. His cost was about $20-$30 cheaper a tire compared to anywhere else I looked online.


Just last week I got my brake line tuck kit in from Rywire and tossed it in over the weekend. I forgot to mention that I was using a ek master on my setup so they sent lines for an ef master but I made it work. I had limited spots to put the bulkhead fitting on the firewall since the hydro conversion took up the area where I wanted to put them and they had to clear all the pedals. The spot isn’t the greatest but it’ll do. For the rear lines I moved them inside from the firewall and bent them to where my pedal assembly was and just threaded on the lines. Once again, not the greatest but it’ll do.


That’s all for now, I’ll try and keep this updated more often as parts slowly start rolling in.

Stay safe everyone!

Since the last update I’ve managed to get a few more things in and installed, slowly the list is getting short and shorter. About a week after getting the tires in I got my buddy to mount and balance the 225/45 on the pair of 15x8 CR01 and I think they look pretty good with the RS4s mounted on them. I did a quick test fit of them on the rear and I’m gonna have to either pull the fender a bit or shave the hub of the wheel down to a +35ish offset to make it fit without a pull. I’m looking into getting a camber gauge so I can at least setup camber in the garage and help dial in in fitment.


Just a couple weeks ago I received some parts that I’ve been waiting for for a few months now due to a back ordered item. I managed to score an open box Radium direct mount fuel pressure regulator for a very good price plus some rack and trailing arm bushings on sale as well. I have solid rack bushings on the way but I need to double bush it since I have a manual rack in a power steering subframe. The blox street muffler was another clearance item I got for cheap so I decided to pick it up with the fpr. Originally I ordered Hardrace trailing arm bushings but was told they were going to be on back order until Sept after waiting almost 3 months already for them but found out that the Ktuned and Megan Racing ones are just private label Hardrace so I swapped them out for Megan ones. The Mfactory 1.0way plated lsd is something I can’t wait to try out once I get the car up and running. I’ve heard these lsds are very good and they also have lifetime warranty if anything goes wrong.


Finally decided to wash the car since it was covered in about 2 years worth of dust then tossed on the car cover I got from Just Drive Shop. The fabric is a lot thinner than what I thought it was going to be but still is a pretty nice car cover.


Picked up my autopower roll bar awhile back as well so I quickly tossed it in the car to see where I would need to drill the holes. I still haven’t done that yet and have to trim the carpet still as well.


Just recently I got my front spindles freshened up by a buddy of mine. I hit them with a drill and a wire wheel and was going to paint them afterwards but they cleaned up well enough so I left them as in then dropped them off to get my Karcepts 36mm hubs, fresh koyo bearings and honed developments extended ball joints pressed in. To go with the fresh spindles I got PCI front upper control arms that I ordered awhile back. These things are beefy as hell! Definitely worth the wait that’s for sure. Put the hardrace eyelet bushings that I had for awhile in them and had to bend the tab of the arm a little bit to fit them. Without doing it the bushing on one side was way too tight in there.


To go with the fresh spindles I gave the trailing arms a quick coat of paint to make them look somewhat decent. It’s not the greatest paint job that’s for sure but it gets the job done. I also installed the honed developments rear roll center adapter and gave it a quick coat of black paint as well since I didn’t like how much the zinc finish stood out. Thinking about getting them powder coated black since the paint job wasn’t the greatest again. After I get the trailing arm bushings installed they’re off to get the trailing arm gussets welded on that I got from honed as well.


That’s the end of the copy and paste from the other forum, since then I really haven’t done much, bought a couple more things but mostly been working. Spent too much over the summer and now it’s time to fill up the wallet again haha.

I gave the subframe a nice fresh coat of gloss black after painting the the rear trailing arms since I still had quite of bit of paint left in the can


One night I was bored so I quickly tossed on the 15x8 Works on the front with the stock fenders. My 15x9 CR01s that I ordered this summer should be here around late Nov/Early Dec, can’t wait to see those on with the Js flares or the Osaka JDM fenders whenever those show up.


To finish off the suspension in the rear I went with the Honed Developments rear camber arm and PCI toe arms. I also ordered the Honed trailing arm gusset plate and solid rack bushings. Only thing is with the rack bushing is that I have to double bush it since I’m using a manual rack in a power steering subframe. Originally was going to use the Hardrace/Megan Racing trailing arm bushing but the taper is slightly off compared to oem and was having a hard time installing them since I don’t have a press to use. I sold those off and got oem ones for a good price instead but have yet to install them, still debating if I want to go with the PCI ones instead since most the rear is already spherical.

A buddy of mine had some spare EF8/9 headlights kicking around that he wasn’t using so he went and polished and cleared them before selling them off to me and they look absolutely mint. The other pair I had wasn’t the greatest and one light had been resealed before so I sold those off after grabbing these. He also replaced the amber lenses on my bumper lights to these clear ones I picked up on eBay. They’re not 100% exact but very close and is a decent replica of it, my old ones were heavily pitted and one was had a chipped lens so they were going to get replaced one way or another.

Just a little while ago I scored this brand new TSX/Z3 6th gear set for my Type S transmission to lower the rpm during highway cruising and this BattleCraft shift knob for my Hybrid shifter. I have one of the new Acuity RSX shifters on order to replace the Hybrid unit and I can’t wait to get it, should be here around the end of Nov.

That’s all for now folks, probably going to be slow on the updates, it’s nearly winter here and I don’t like working in the cold lol

7 Likes

Yes! I forgot about the chaser you had, and seeing these pictures again makes me excited to dig up my old photos.

2 Likes

Awesome build keep it comming

1 Like

Looking good , wasn’t that midori on a magazine at one point ?

1 Like

Ooof, always a pleasure look’n at your EF8 Steven. Believe our oldest son sent you a message ask’n to sell it to him recently ha Great work my dude!!!

1 Like

I often forget that I owned that too haha, wish I had the old photos of when I first had it, sucks that I lost a lot of photos due to photobucket

Thanks! Glad you enjoy it so far

Yessir! It was in Honda Tuning and Super Street at one point.

sstp_0910_02+1996_honda_civic_hatchback+front_left

5 Likes

Yeah it was yesterday afternoon when he sent me that message haha

Now this is a build! I’m in :popcorn:

Great read dude, stoked to see it come together!!

1 Like

Great build! Can’t wait to see the final product.

1 Like

damn she lookin good man! Keep us posted :+1:t3:

Thanks!

Just a quick update, I picked up my Acuity shifter this past Friday and I must say this thing is a solid unit! I went with the 4way instead of the 2way that they also offer and it was worth it. Loads of adjustability with this, can’t wait to try it out once everything is up and running.

2 Likes

This things hot! Read the whole thing lol loving the progression of it… makes me wanna get more down and dirty with my build

Thanks, it’s been quite the journey so far haha

Since the last update I haven’t really done much towards the car but I have a major change for the car which you’ll see down below.

A few weeks after I picked up the Acuity shifter a friend of mine told me he had a K20A2 long block with allegedly 70k km on it and so without thinking I ended scooping that up. I figured it would save me the trouble of transferring internals from the cracked blocked over to the empty one I picked up and would save me on machine shop costs. I was still planning on doing the timing chain/tensioner and guides but at least I had something I could drop right in.


After looking at the engine some more it looked like the timing chain cover had come off at one point since there was some black sealant oozed around the sides of it, the inside of the valve cover and head looked very clean so I didn’t suspect it being a high mileage motor but I could never confirm if it was 70k km or not.

During Black Friday I ended up ordering a K20 swap header from DTR Header since he had a very good promotion going on for his DTR Design branded headers he offers. Surprising it came super quick, shipped on a Monday and received it Friday the same week before I headed off to work. I also ordered an Action Stage 1 clutch and aluminum flywheel from my local speed shop since they also had a good promo going on for those. Still have yet to receive those but should be here shortly.


Earlier in the build I had an ebay scirocco radiator that I was going to use but ended up trading it for some other parts awhile back, so while I was browsing ebay for some parts I stumbled upon a seller that was selling the Koyo pocket radiators for $100usd cheaper than any other retailer I had found. I found that sometimes on ebay seller will have brand new parts for under retail and shipping up to Canada is pretty cheap as well if they’re partnered up with ebay, just something to look out for.


During Boxing Day Yonaka was having this deal for their shifter cables for nearly half off so I decided to get them and give them a try. They’re the “oem” style cables and looks like the same ones that Ktuned offers as well. I’ve heard mixed reviews on these style of cables but for the price I wouldn’t be too upset if they broke.

Everything was on track to get everything ready up and running by spring but during the holidays me and my mom came to an agreement where I would start paying for the house as she was moving into her house by the lake this summer. So because of that I decided to part out my K series stuff and go back to B series so I could free up some cash and still go racing this year. Surprising I sold mostly everything minus some misc stuff I found laying around within 2-3 days and made a deal with a friend of mine to assemble a B20v and overhaul a GSR transmission for me. I ended up trading a lot of my stuff for B series stuff so it made it quite easy to transition over.

So far the B20v looks like this:
B16 head
B20 block
84mm ITR style pistons
ARP head studs
Resized B20 rods w/ arp rod bolts
Zerg Industries headgasket
King Race bearings
ACL oil pump
Moroso oil pan
AEM fuel rail
AEM fpr
RSX Type S 310cc injectors
Gates water pump + tensioner
Gates Performance timing belt
AEBS intake manifold
Speed Factory 70mm throttle body
TracTuff swirl pot
Supertech lost motion assemblies

It’s pretty much the same setup I was going to run the first time around so everything came full circle I guess lol. Everything on that has been ordered and just waiting on everything to come in, still need to save up for a few other things for the motor then I can get onto the transmission side of things.

So far I’m looking at doing:
Synchrotech carbon synchro rebuild kit
B16 3rd gear
Mfactory 1.5way LSD
Mfactory 4.92fd

Hopefully everything on that list will be ordered by the end of March to make it in time for the first test and tune of the year.

Just a few days ago I finally got the message that the pair of Work wheels that I had ordered during the summer have finally come in! Thankfully I live 5 mins away from the speed shop that I ordered them from so I headed over there after work to pick them up and I must say, it was definitely worth the wait. I wasn’t too sure how I would feel on the gunmetal colour but after seeing them in person it’s a lot nicer than what I had thought it. I really like how the T disk really makes the hub/lug area really concave vs the pair of A disks I picked up last summer as well. Originally I was planning on polishing this pair to match the other pair I have but I’m not too sure anymore.


While I was at the speed shop I also picked up my new koyo rad to replace the pocket version one I had sold. Still planning on getting the -16 bungs I have welded onto it since the swirl pot that I ordered has -16 connection for it as well. I need to make some new radiator tabs since I had cut the original ones off awhile back.

While I was walking out the door with goods in hand they asked if I was interested in some strut bars that they had found in the back of the shop. I wasn’t really looking for strut bars at the moment but I figured I’d ask anyways. Turns out they had found front and rear set of passwordjdm strut bars in winkle black that they ordered years ago but never ended up selling so they gave them to me for a steal. The front is a 3 point bar that attaches to the firewall so I was a bit worried that it would hit the brake master cylinder but it just barely clears it. Not too sure how I feel about the winkle black finish but not sure what I would redo them in either.


Just the other day I got the pair of 245/40/15 mounted on the pair of 15x9 +10 CR01s I had picked up and quickly tossed one on the car with the Js flare to see how it would sit. There wasn’t a rotor attach to the hub so the wheel would stick out 5-10mm further but it seems like it’ll work, just need to shave the inner lip of the flare off for some extra clearance.


Just playing the waiting game now for my motor parts but I’ll try and get some updates on it while it’s being assembled. Thankfully I’m pretty lazy and didn’t end up splicing the wires for the k swap conversion harness and for the fuse box tuck that I was going to do but since I didn’t it’ll make everything a lot easier to put a B series back in here.

8 Likes

Can’t wait to see this in person. Nice to see all the progress in one place.

2 Likes

Thanks man, hopefully I can visit you and Joe this summer once it’s done.

Another small update, had a few more parts come in over the last few weeks and some progress on my motor. The short block should be ready to go later this week then my friend is going to start assembling it. Little worried about p2v clearance since we did skim the head plus a little bit of the deck surface and Im planning on running a thinner head gasket as well but we shall see.

Parts wise I had a few things come in, my Hasport mounts and weld in bracket came in fairly quick. I ordered the billet replacement mounts for factory EF8/9 with factory B16 and a hydro trans b swap mount so I could run the hydro GSR that I have for the build. The factory EF8/9 trans side mount is actually bigger than non SiR chassis so if you were going to use the Hasport B series hydro trans mount you would have to run a spacer to take up the space. If you recall mine was actually bent and I drilled it out and removed it for the K swap weld in bracket which I never got welded in. Just recently Hasport released a replacement weld in trans bracket for b/d swap cars so I ordered that but since the SiR chassis frame rail is a different shape it’s not a bolt/weld in affair. Most likely will have to cut it up and mock up a block w/ trans to see where the mount would sit. Also for those who have a SiR chassis, the engine mount and rear mount are DA mounts so if you needed a quick replacement mount you could use one of off those.

Another item that came in fairly quick was my budget Rywire harness, took only about a week and a half to come in after ordering it which was nice. One thing I didn’t notice was that they updated their chassis harness adapter for it, you used to have to splice into your chassis harness but now it’s a plug and play deal now.


A few days ago I got my trailing arms back with fresh oem trailing arm bushings and the gusset plates from Honed Developments were welded on. We forgot to clock the bushings for lowered ride height but Im probably going to replace them with PCI spherical ones next season anyways so I’ll just leave them as is.

Having my trailing arms back meant I could test fit my wheels with the car on the ground so I quickly tossed on one side just to see how everything would fit/look like and I was not disappointed. I only did one side because I was super lazy and I knew the trailing arms would have to come off again to get repainted.


8 Likes

man O manawhich, this is killer!