Last January I decided it was time to get rid of the Lexus LS400 I’d been driving for the last 7 years as a daily. I drive from one end of town to the other every day for work and had this car up to 230k miles. It was falling apart and because of that, I had lost interest in it. It had served me well, but I was ready to move on.
So, my search for a 4 door Honda began. I wanted something with better gas mileage and room for passengers. Honda’s ease of being able to fix things myself has always drawn me to them, so I was mainly looking for a 15 year old or newer Civic sedan.
That’s when I came across a 1999 Acura CL with decent mileage that appeared to be well taken care of for it’s age. Not a sedan. Not a 4 cylinder. 20 years old. BUT, it was different. It was unique and that’s what I’m all about.
I went to check th car out the next day. The guy selling it was a former Acura tech who now owned his own shop. He had maintained the car over the years as the female owner had always brought the car to him and eventually gifted it to him after she herself moved on to another vehicle. The body was rough, but the interior was in great shape, it ran well and had years of service documents. I wanted it. I offered the guy $1500 and the car was mine.
The next day I drove it straight to the body shop I’m employed at to assess the body. The clear was peeling on most panels, but worst on the hood. There were small dents and dings on every panel, but nothing major, and a small spot of rust on the right quarter panel. My plan initially was to just clean it up and drive it. That’s all it was supposed to be any way, a daily. Then I figured why not just paint the hood and front bumper and polish the rest of the car to improve it a little. My co-workers though asked me “if you’re going to do that, why not not just paint the whole thing?”.
Well, I did still have the Lexus to drive in the mean time…sure. Why not.
Before I got too far into it, I wanted to be sure that the rust could be repaired. There would be no reason for me to go through with all this if there were still a spot of rust in the quarter panel.
I ran down to the salvage yard and grabbed a left fender off of another CL. When flipped around, the curvature and body line toward the front of the wheel opening on the fender matched very well with that of the right side quarter panel.
As part of a trade, work for work, I had one of the body repair guys in our shop patch the rust for me. I will tell you, most body guys hate dealing with rust. It’s not always a guarantee that it will stay away forever and because of that most of these guys don’t want their name attached to it. I had to bug this guy all week to get him to do this for me!
The plan was never to turn this into a project car, but wheels and a drop are necessary for any dail driver at minimum. I searched for wheels for a few weeks and was mainly looking for 17’s. I somehow came across a guy on Instagram who had an old for sale post for these 18" Gewalt Evolutions. I thought I’d go ahead and ask if he still had them just in case they might still be available. I wasn’t sure how they’d fit, but I always liked these wheels back in the day and it would go with the period correct theme that I always tend to sway toward. After a little back and forth, they were shipped and made it to me for much less than I had planned to spend! I still can’t believe the deal I got on these and they totally change the look of the car.
They’re basically a luxury Accord coupe. Some of them came with either auto or manual 2.2 or 2.3 4-cylinders. The model I have came with the auto J30 3.0 V6. They only built around 95,000 of them and I believe were only sold in the U.S.
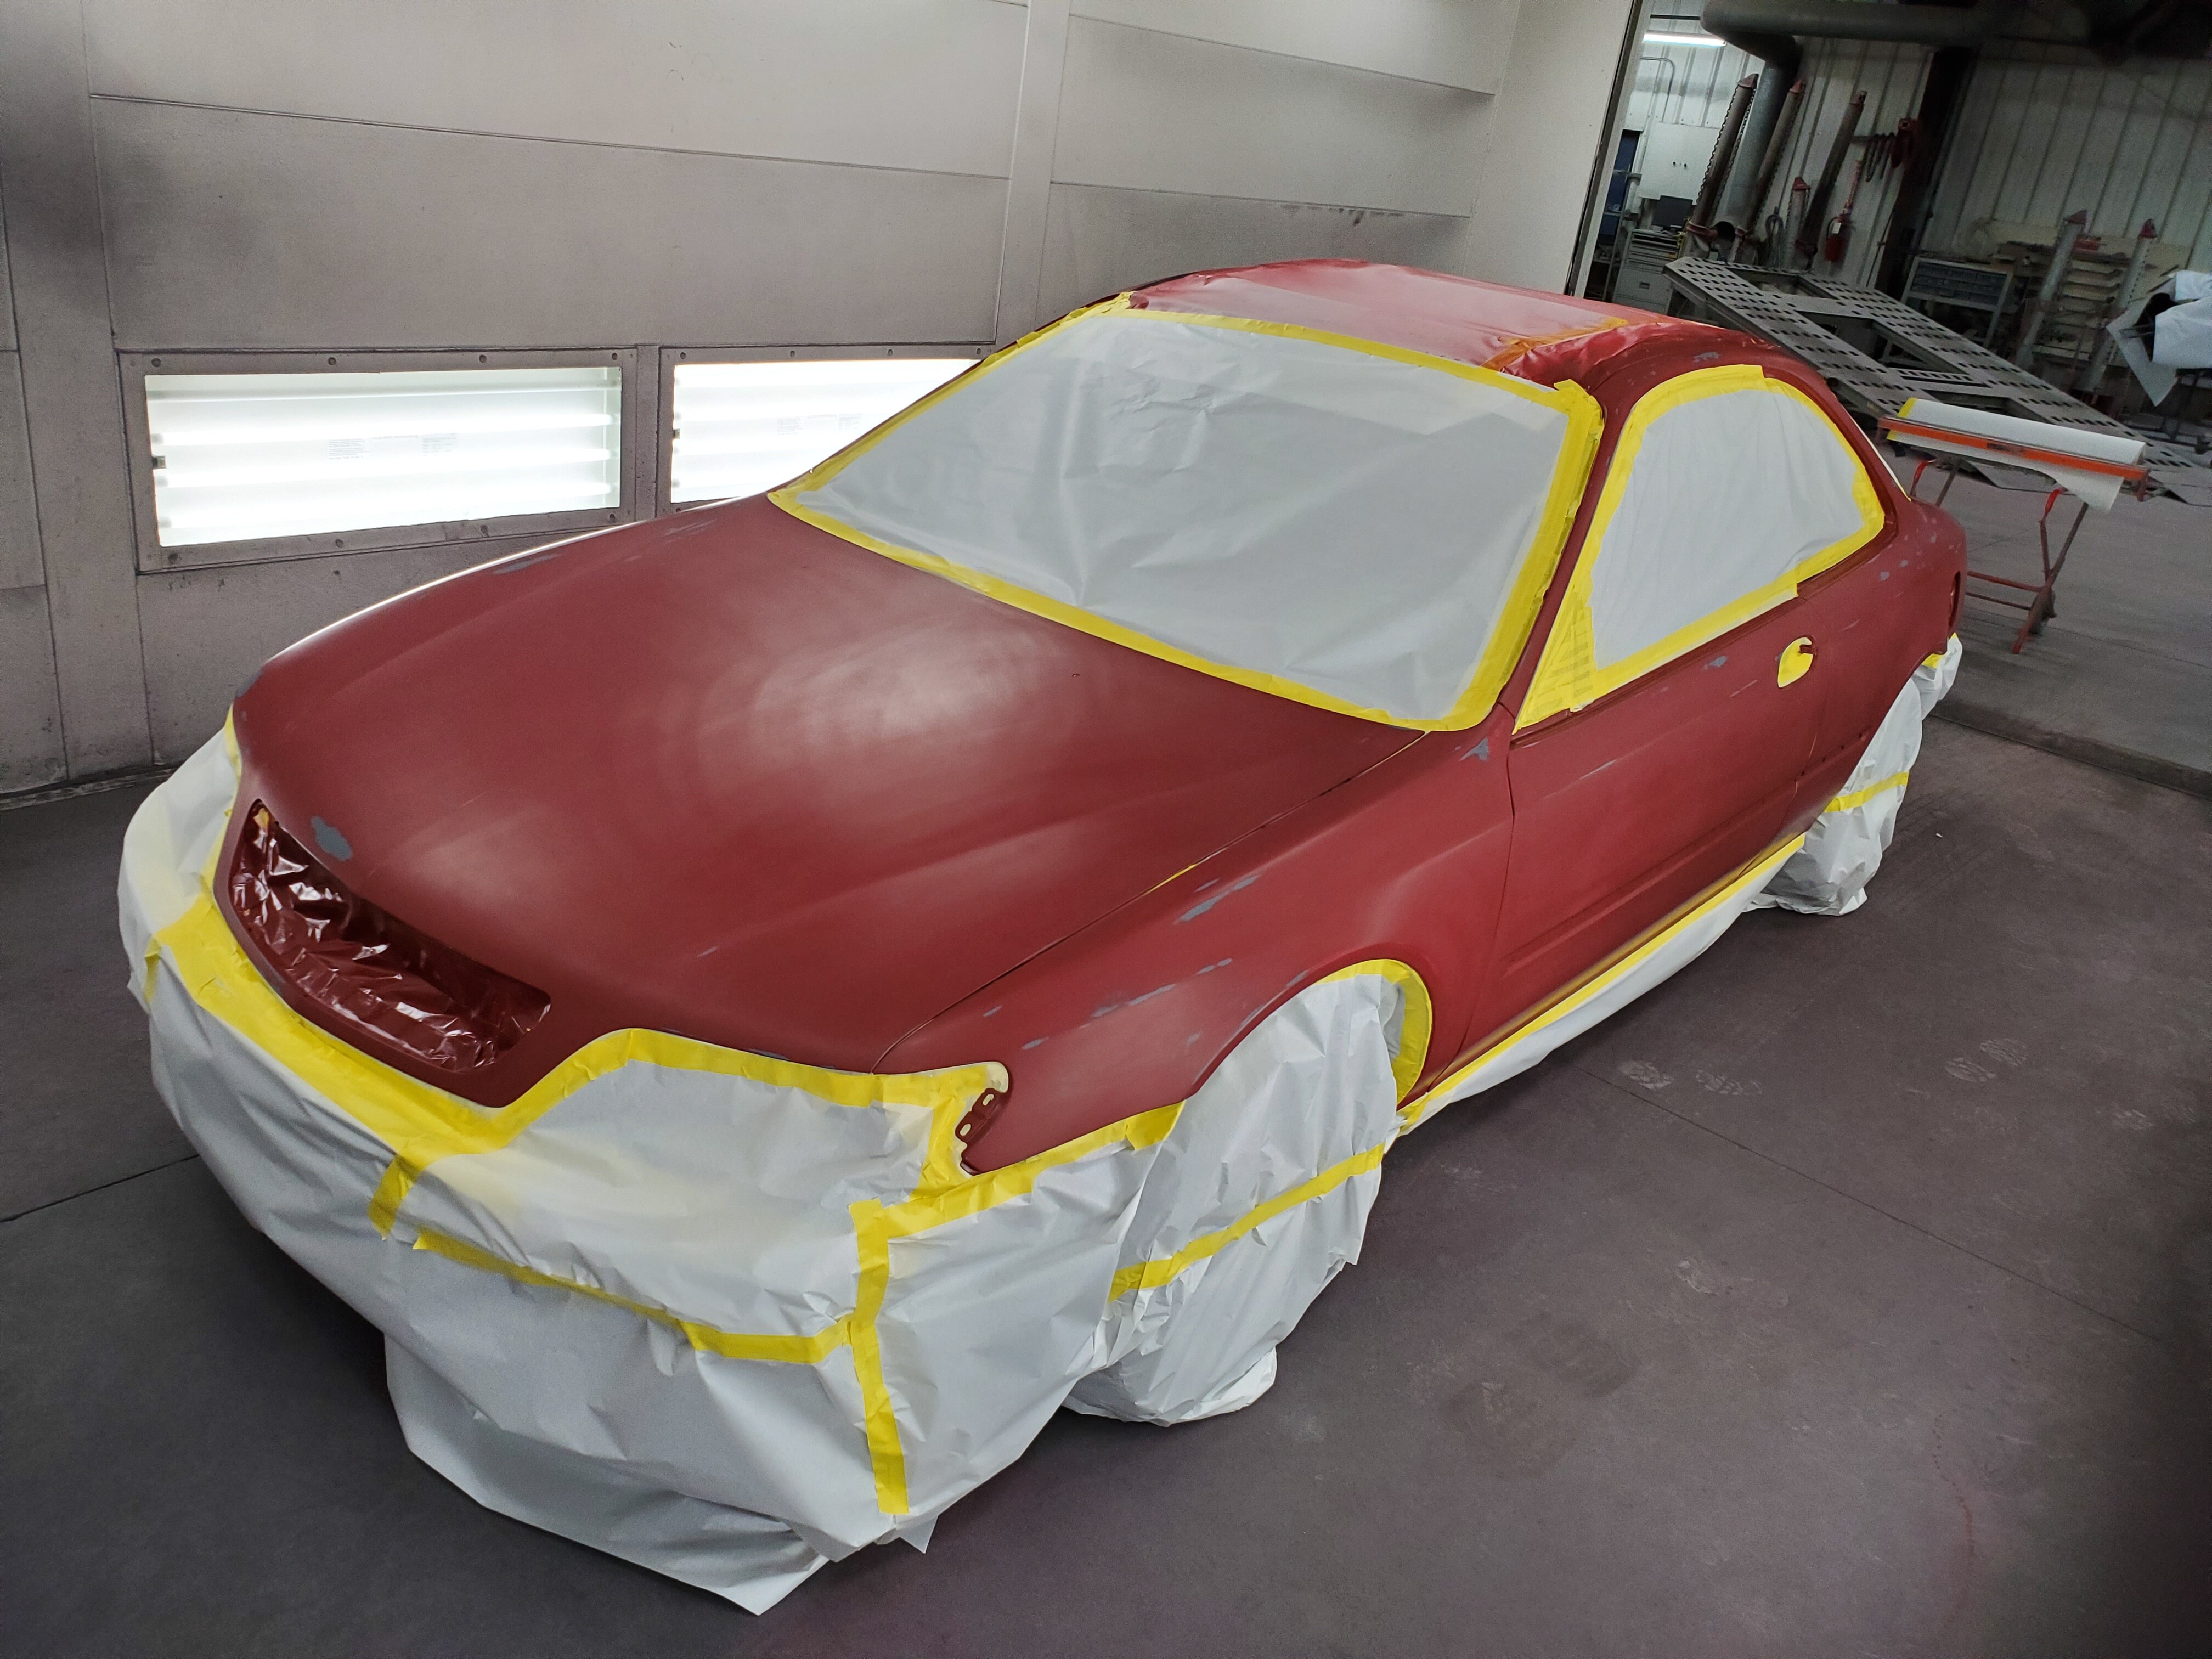
Now that I had the rust patched up I felt comfortable with moving forward on the rest of the car. As I said before, the hood was the worst of it. There were 7 or 8 good size dents that needed to be repaired on top of completely stripping all of the failing material from it and the tops of both fenders to start from new. WHAT A MESS.
Now, onto the driver side, where I found some previous body work. Although it seemed they had done decent work, I preferred to remove the old filler and start over with my own.
Surprisingly, the roof and deck lid were dent-free. They however did have clear peeling on them, so they were stripped and primed as well.
I also had the rear and quarter glass removed by this point to ensure that I removed all of the failing material. This was about 3 weeks in.
After finally completing all of the body repair and with everything that needed it being primed, it was finally time to get into the next step: COLOR.
After many nights working late after my regular 10 hour day, this is where things start to get exciting. The vision at the end of the tunnel is beginning to become more clear.
A little something about me, I used to always be one of the smarter kids and it was always thought I would get into some sort of career that only used my brain power. But, my passion for cars was too great and after having one desk job I knew I couldn’t sit still in front of a monitor day in and day out. I love what I do. It gives me a great deal of fulfillment to see things go from ugly to beautiful whether it be for myself, helping out my friends with their cars or doing insurance work for complete strangers that I’ll never meet. This is my happy place.
I decided to paint the roof separately from the rest of the car so as to keep overspray from landing on the other top panels, creating more polish work for me to do afterward. So, I put the car in one booth and all the removed parts in another and started spraying.
Thanks man. I started out just washing cars and being the parts guy. Just being a good dude and helping out wherever I could I was able to learn a lot and given opportunities over the last 10-15 years to work up to this position without any kind of school.
So, a couple nights later I got the rest of the car prepped to go in the booth and spray what was left. My normal work hours are about 6am-5pm. It was coming up on 8pm by the time I had the car all masked up ready for sealer. Let’s do this.
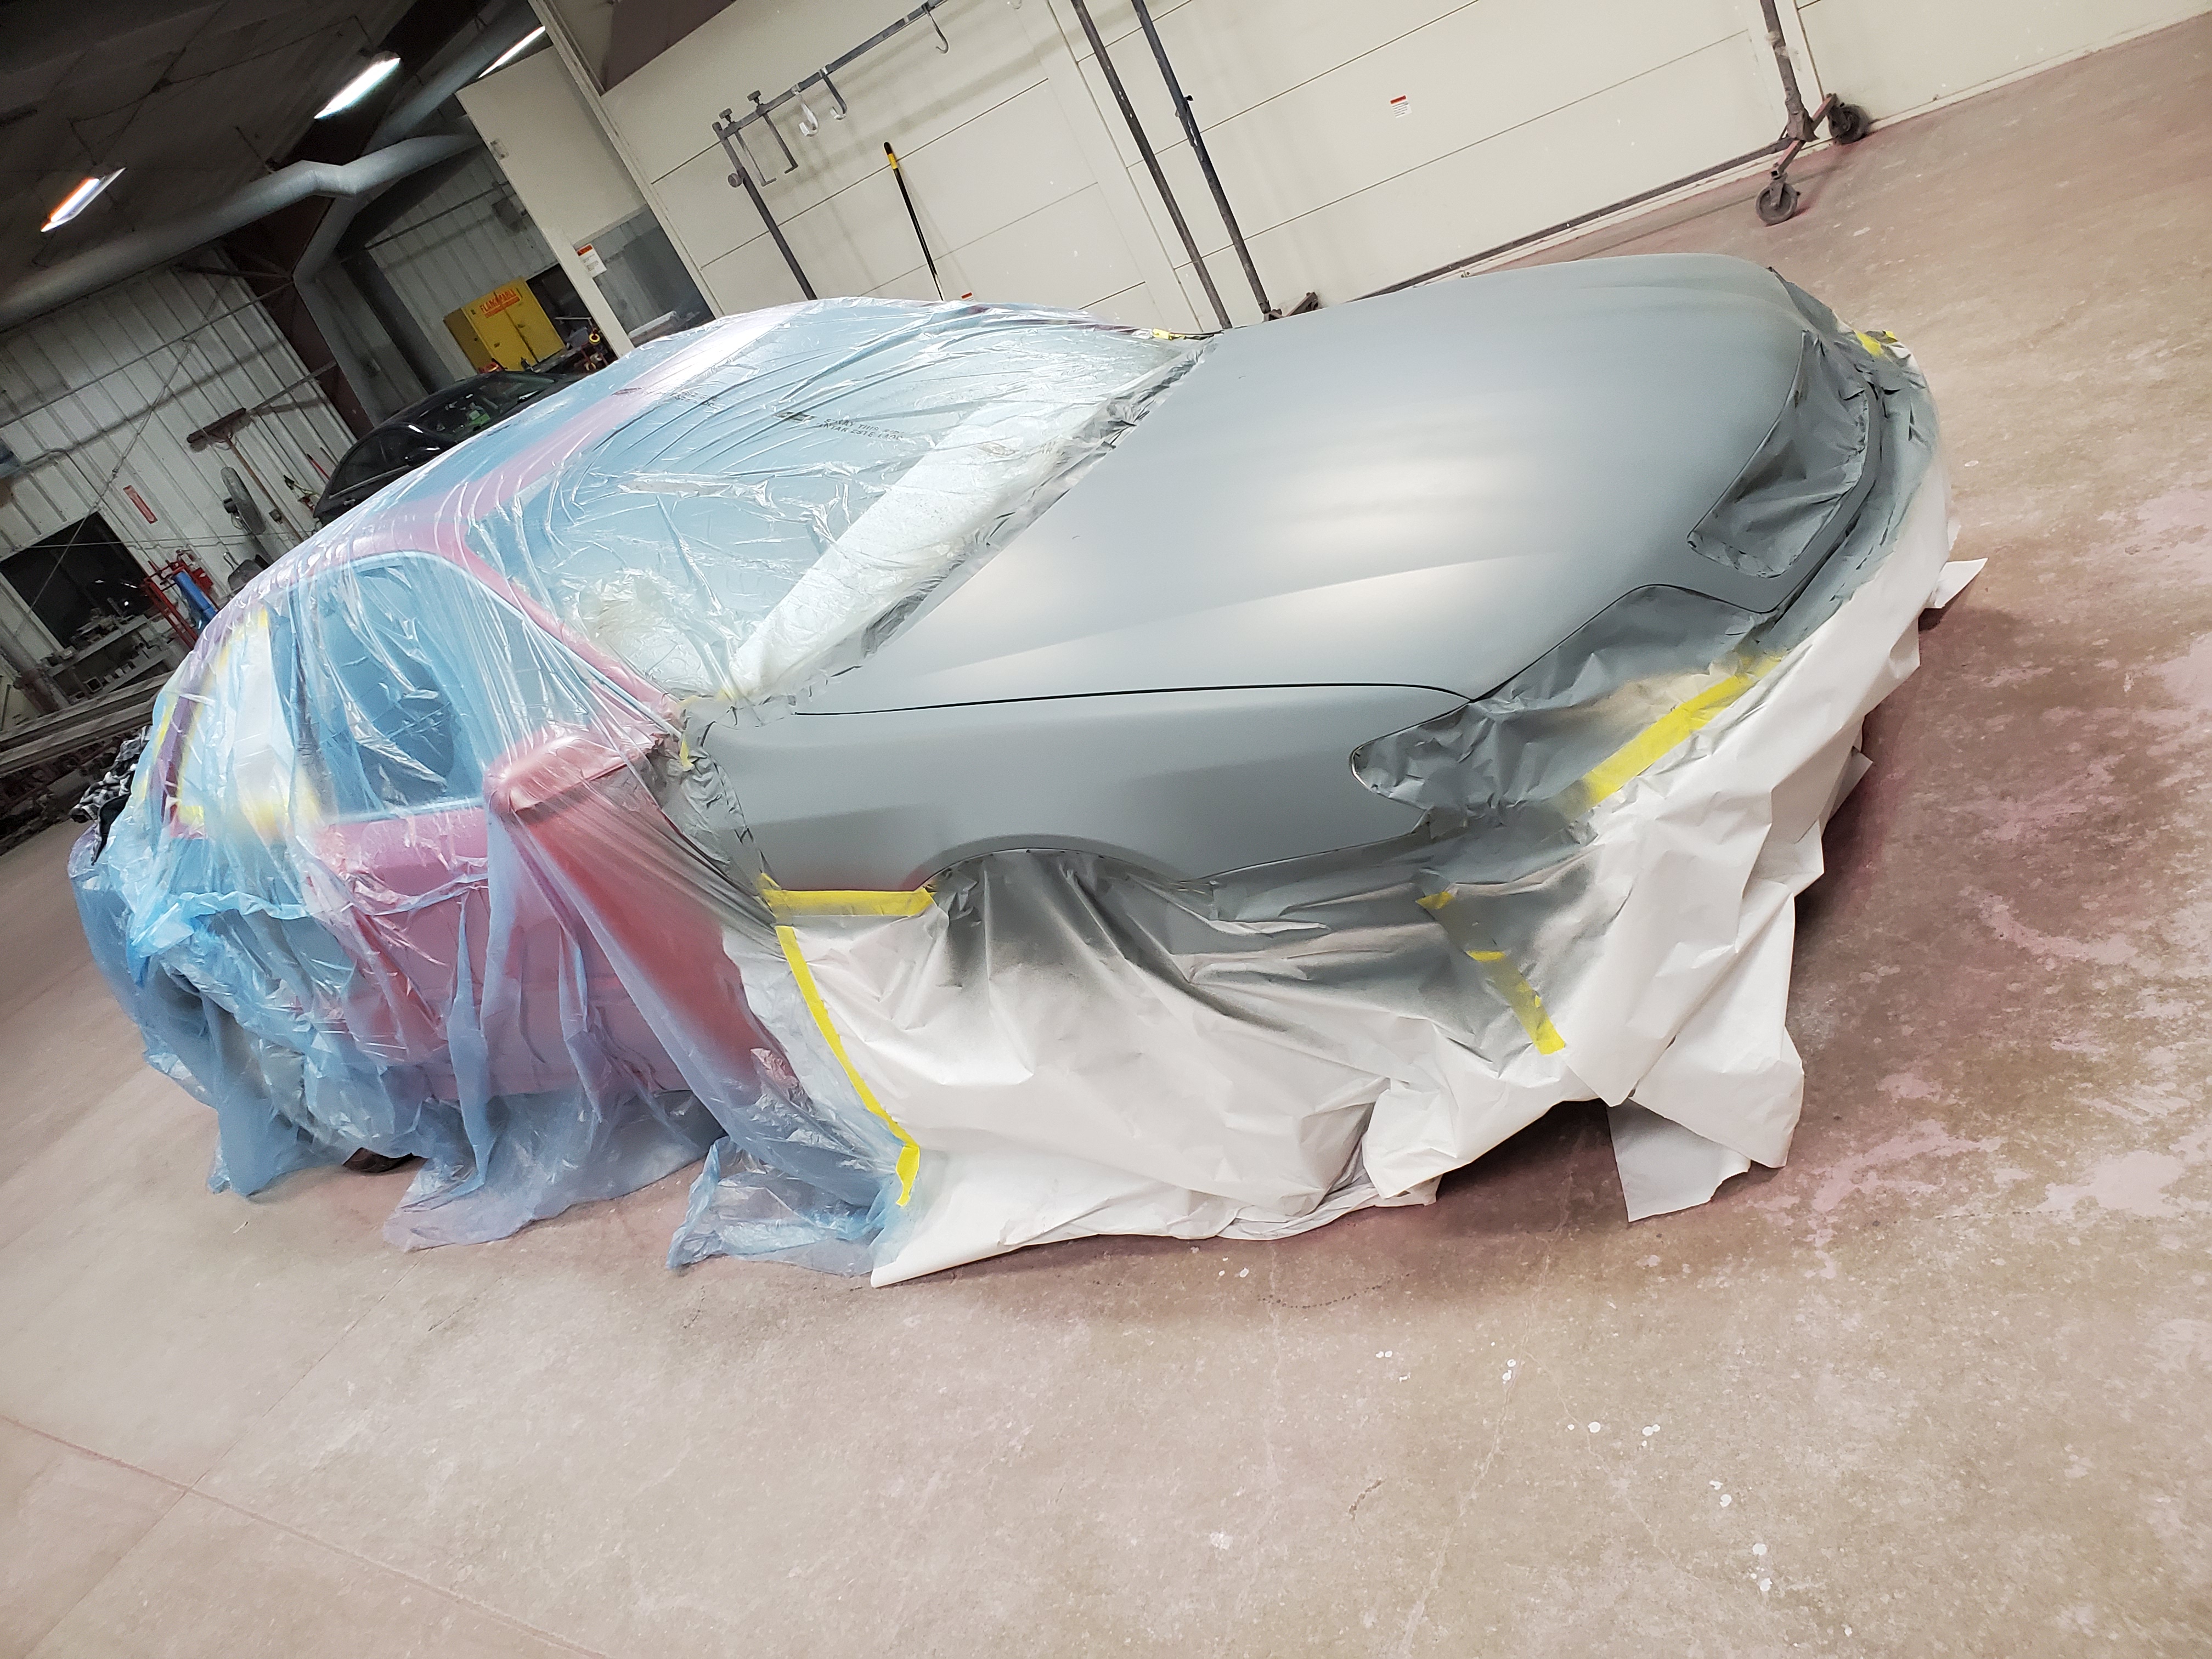
I started going over the top panels with my red sealer and my heart sank. ALL of the sealer on the top facing panels and rolling over the the sides was coming up full of little tiny “fish eyes”, little craters that are caused by the sealer trying to separate from whatever contaminate was setting on the car. Sort of like oil and water. Even after I had thoroughly cleaned the surface three times! All I could do ar this point was finish spraying the sealer over the entire car, bake it then sand all of the fish eyes out and try again another night. I was tired and defeated, but I knew this was just a set back. They happen.
Here’s a look at a small area that had to be sanded back down. These little craters were ALL OVER the car now.
About a week later, I was ready for round two. The car was even more thoroughly cleaned this time around before it went in. This time it was going to go smooth as possible. I could feel it.
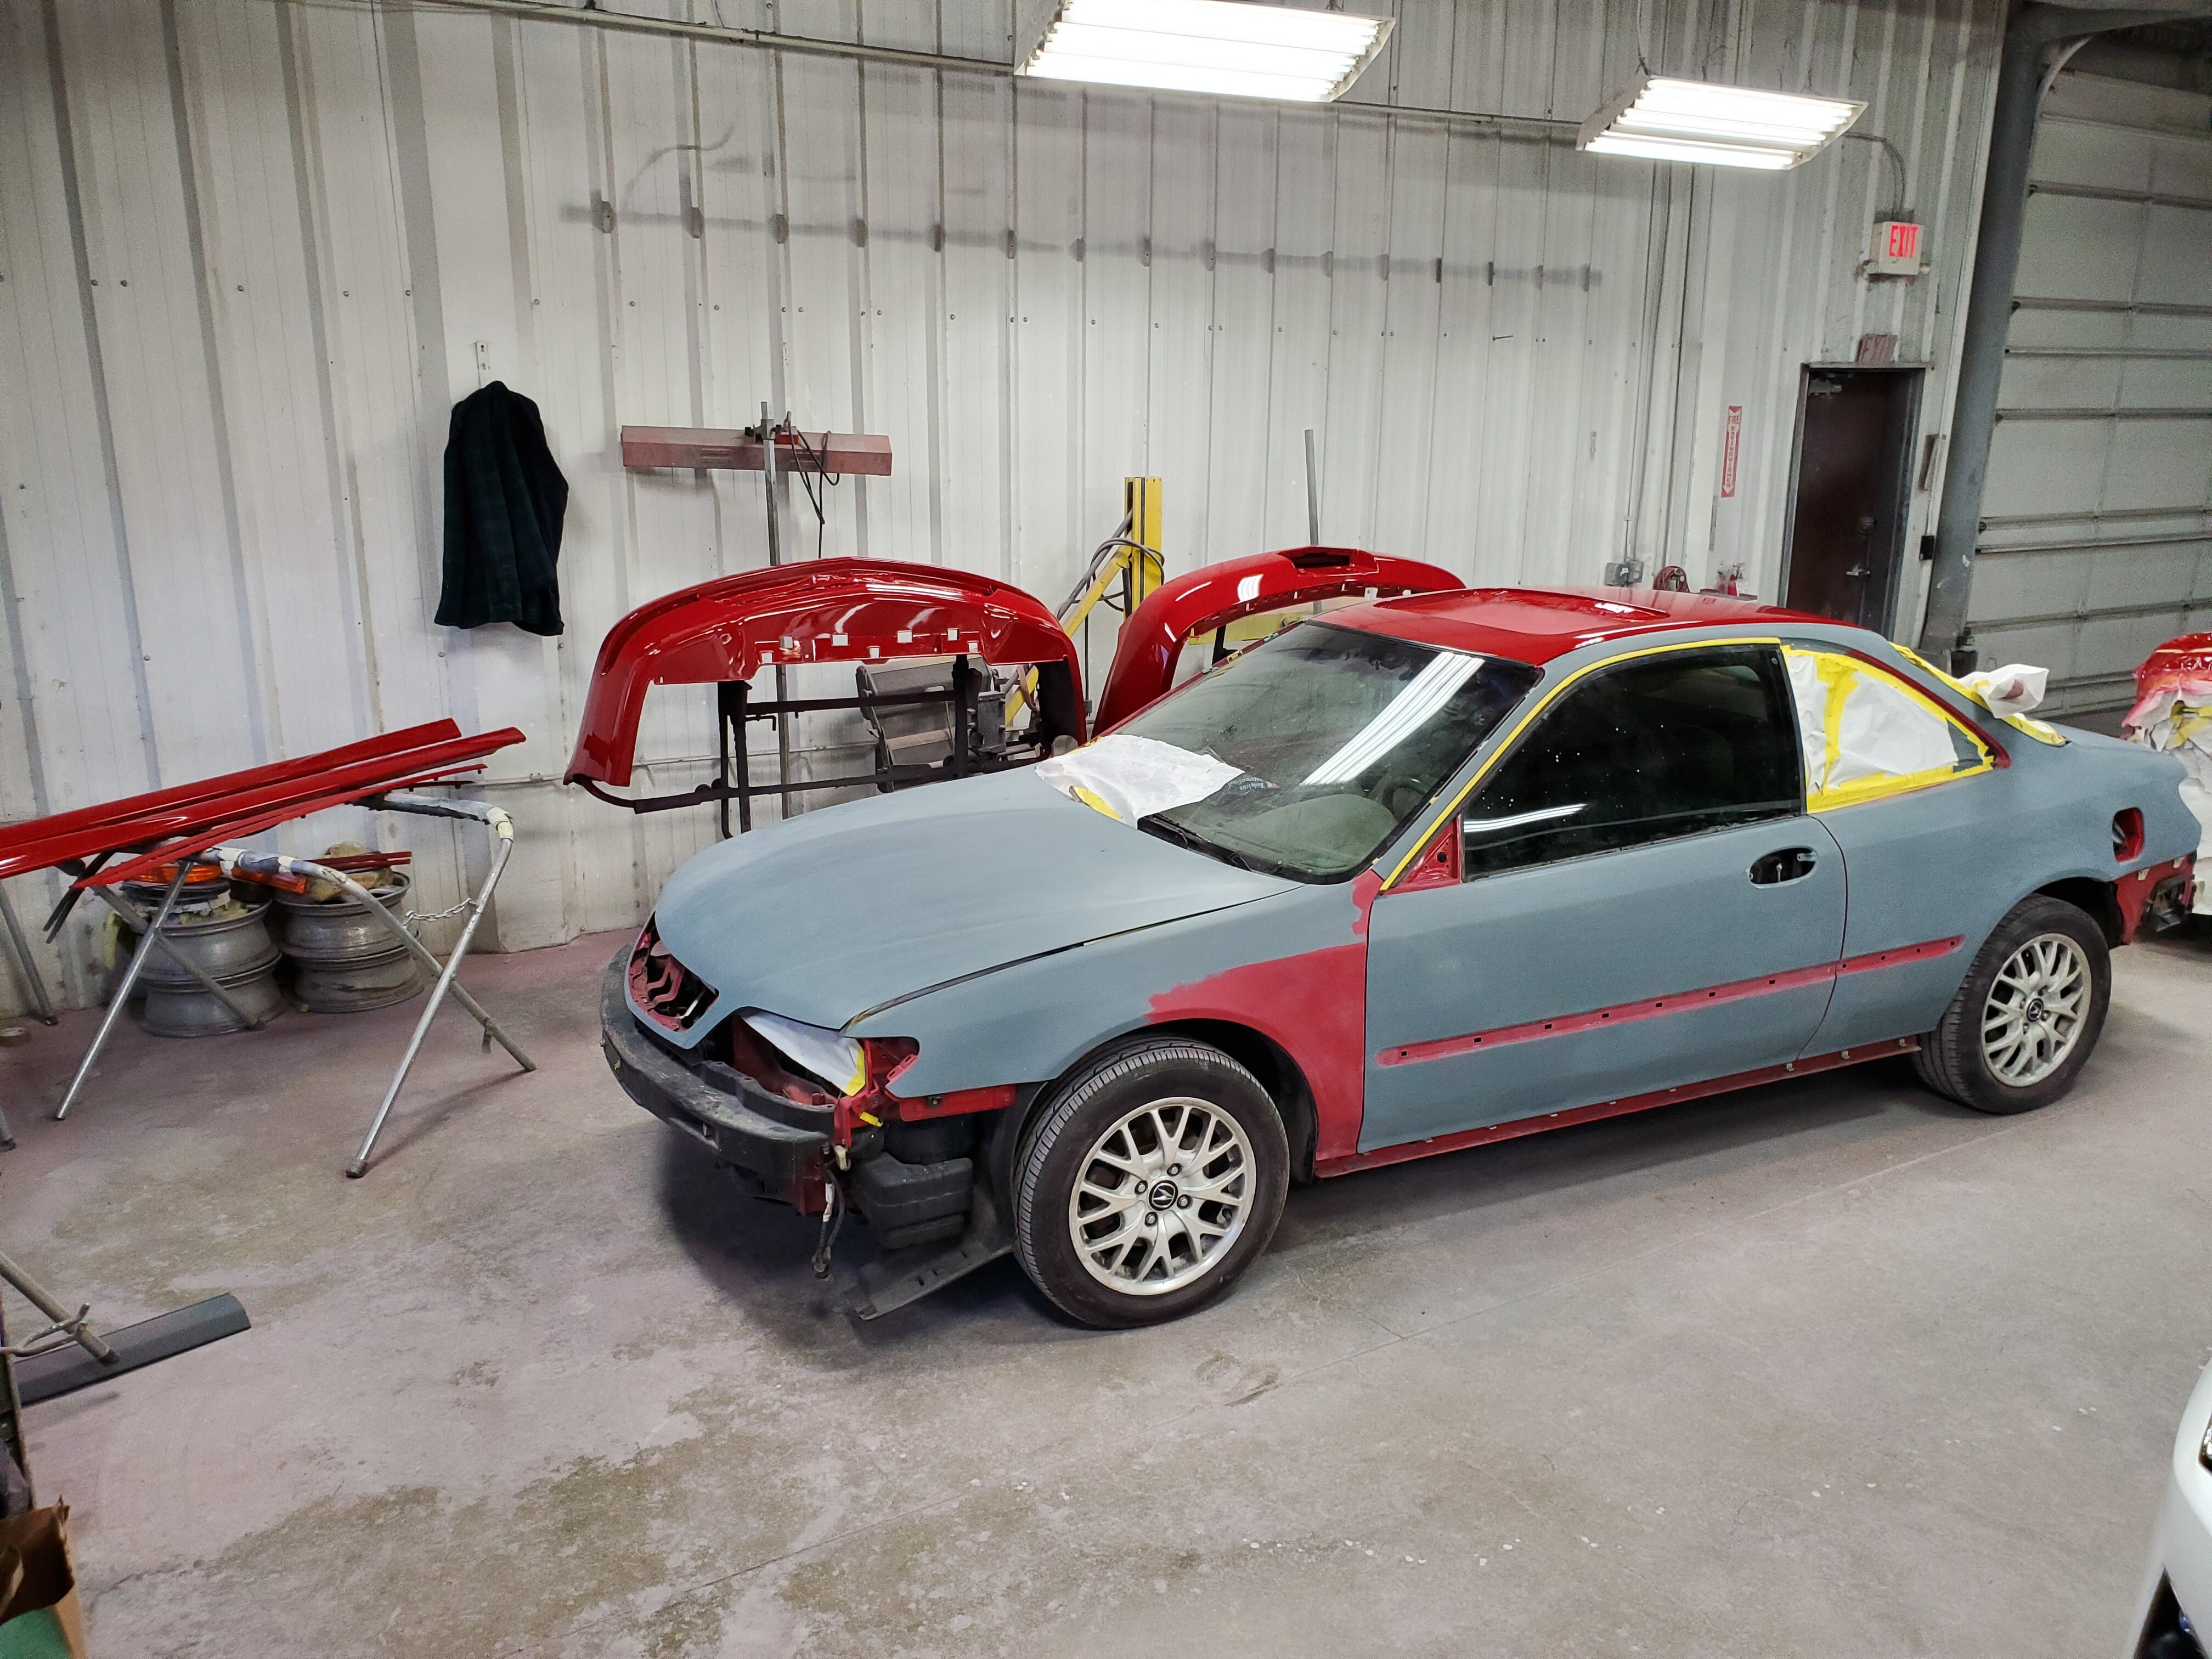
Definitely. There are many factors that can change the look of a color/base coat. These colors are normally very transparent, which is part of why I had to spray red sealer over the entire car before my base coat.
The distance of the paint gun relative to the panel, the speed that I pass over the panel and the amount of coats and overlap can all change how the color looks. With the panels all on the car and next to each other I can make sure that I go over each panel in one long consistent pass for each coat. Whereas if the panels were all separated and I had to stop, move to the next panel, stop - move, etc., my technique could differ without me even noticing much because of the chaos of doing it that way. It normally wouldn’t be a big difference, but once the car was reassembled it could be very noticeable.
Whenever I had downtime at work I would take any parts of the car that weren’t being painted and wet sand / polish them. Every lamp, chrome trim, lock cylinders, emblems, etc. If it could be refreshed, it was treated.
Wiper arms, windshield trim, the grille and a few brackets were painted “trim black”.
Nah, just personal preference, but I don’t like the idea of clearing over them. When they get chipped, which they will with my twice a day 30 minute commute, the chips will be deeper and more noticeable. Clear isn’t as forgiving as the plastic lenses, so they could eventually peel too. When it’s time to freshen them up again, you have to go through the whole process of spraying them also. Wet sanding and polishing only takes about 20 minutes for both, so I just do that a few times per year as they start to get dull.
While I was working on the car I ordered a pair of Cerwin Vega component speakers for the front and 6x9’s for the rear. With the rear glass out this was the best time to replace the rear deck speakers. I decided I might as well replace the head unit as well and put in an Alpine bluetooth unit. This required me to bypass the Bose factory amplifier as well, but with the trunk taken apart this too was made easier. Lastly, I threw in my 12" kevlar Kenwood slim subwoofer with old school 200w Rockford amp all in a slim ported box.
It is supposed to just be a daily, but I’ll be spending too much time in it to be listening to music through 20 year old paper speakers!
I really liked the fact that the Alpine lights could be changed to green to match the dash lights.


 just a drop and a wheel and before you know it you almost need another daily.


 I like the OEM wheels